Matrixplot and Adjplot: Visualize and sort matrices with metadata
This guide introduces Matrixplot and Adjplot. They allow the user to sort a matrix according to some metadata and plot it as either a heatmap or a scattermap. These functions also allows the user to add color or tick axes to indicate the separation between different groups or attributes.
Note: Matrixplot and Adjplot have almost identical inputs/functionality. Adjplot is just a convenient wrapper around Matrixplot which assumes the matrix to be plotted is square and has the same row and column metadata.
[1]:
from graspologic.simulations import sbm
import numpy as np
import pandas as pd
import matplotlib.pyplot as plt
from graspologic.plot import adjplot, matrixplot
import seaborn as sns
/home/runner/work/graspologic/graspologic/.venv/lib/python3.10/site-packages/tqdm/auto.py:21: TqdmWarning: IProgress not found. Please update jupyter and ipywidgets. See https://ipywidgets.readthedocs.io/en/stable/user_install.html
  from .autonotebook import tqdm as notebook_tqdm
Simulate a binary graph using stochastic block model
The 4-block model is defined as below:
\begin{align*} n &= [50, 50, 50, 50]\\ P &= \begin{bmatrix}0.8 & 0.1 & 0.05 & 0.01\\ 0.1 & 0.4 & 0.15 & 0.02\\ 0.05 & 0.15 & 0.3 & 0.01\\ 0.01 & 0.02 & 0.01 & 0.4 \end{bmatrix} \end{align*}
Thus, the first 50 vertices belong to block 1, the second 50 vertices belong to block 2, the third 50 vertices belong to block 3, and the last 50 vertices belong to block 4.
Each block is associated with some metadata:
Block Number |
Hemisphere |
region |
|---|---|---|
1 |
0 |
0 |
2 |
0 |
1 |
3 |
1 |
0 |
4 |
1 |
1 |
[2]:
N = 50
n_communities = [N, N, N, N]
p = [[0.8, 0.1, 0.05, 0.01],
     [0.1, 0.4, 0.15, 0.02],
     [0.05, 0.15, 0.3, 0.01],
     [0.01, 0.02, 0.01, 0.4]]

np.random.seed(2)
A = sbm(n_communities, p)
meta = pd.DataFrame(
    data={
        'hemisphere': np.concatenate((np.full((1, 2*N), 0), np.full((1, 2*N), 1)), axis=1).flatten(),
        'region': np.concatenate((np.full((1, N), 0), np.full((1, N), 1), np.full((1, N), 0), np.full((1, N), 1)), axis=1).flatten(),
        'cell_size': np.arange(4*N)},
)
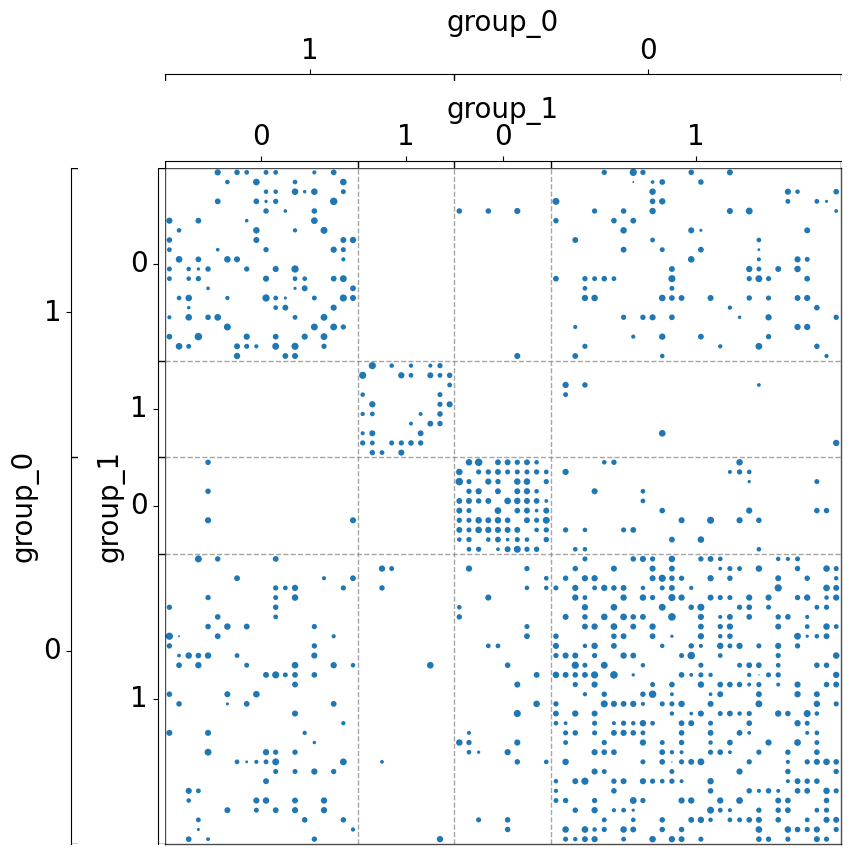
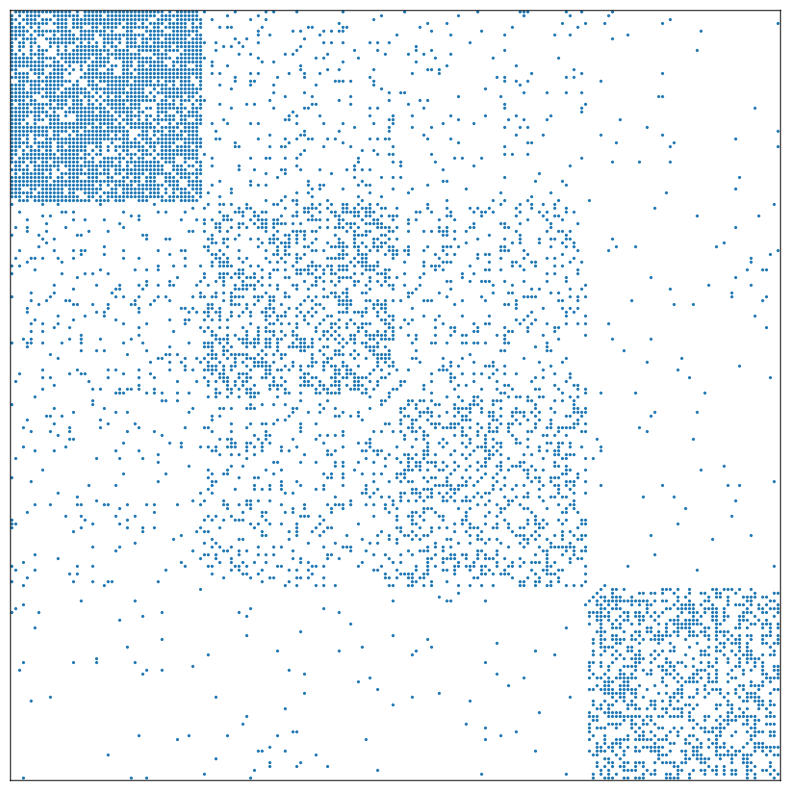
With no randomization, the original data looks like this:
[3]:
fig, ax = plt.subplots(1, 1, figsize=(10, 10))
adjplot(
    data=A,
    ax=ax,
    meta=meta,
    plot_type="scattermap",
)
[3]:
(<Axes: >,
 <mpl_toolkits.axes_grid1.axes_divider.AxesDivider at 0x7fe1c17e5660>)
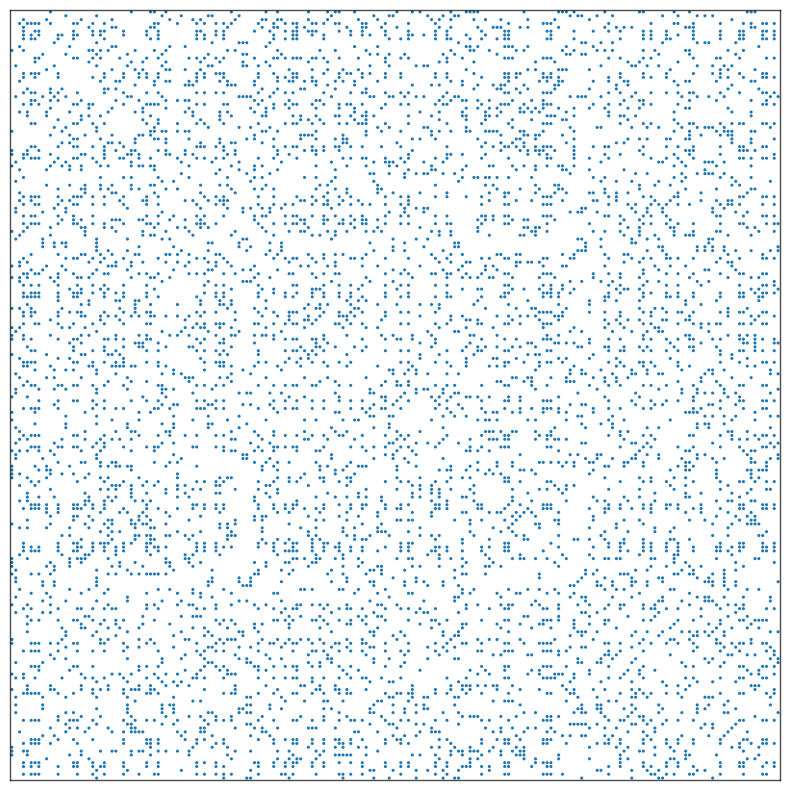
Randomize the data, so we can see the visual importance of matrix sorting:
[4]:
rnd_idx = np.arange(4*N)
np.random.shuffle(rnd_idx)
A = A[np.ix_(rnd_idx, rnd_idx)]
meta = meta.reindex(rnd_idx)
The data immediately after randomization:
[5]:
fig, ax = plt.subplots(1, 1, figsize=(10, 10))
adjplot(
    data=A,
    ax=ax,
    meta=meta,
    plot_type="scattermap",
)
[5]:
(<Axes: >,
 <mpl_toolkits.axes_grid1.axes_divider.AxesDivider at 0x7fe1c17e5630>)
The use of group
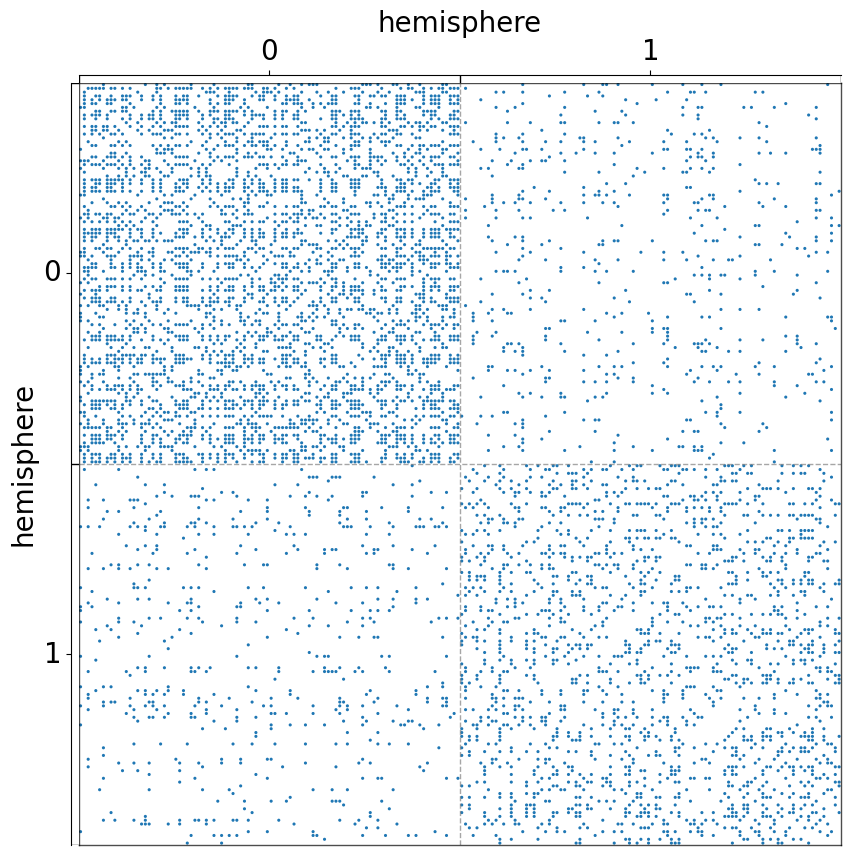
The parameter group can be a list or strings or np.array by which to group the matrix
Group the matrix by one metadata (hemisphere)
[6]:
fig, ax = plt.subplots(1, 1, figsize=(10, 10))
adjplot(
    data=A,
    ax=ax,
    meta=meta,
    plot_type="scattermap",
    group=["hemisphere"],
    sizes=(5, 5),
)
[6]:
(<Axes: >,
 <mpl_toolkits.axes_grid1.axes_divider.AxesDivider at 0x7fe1c1972ad0>)
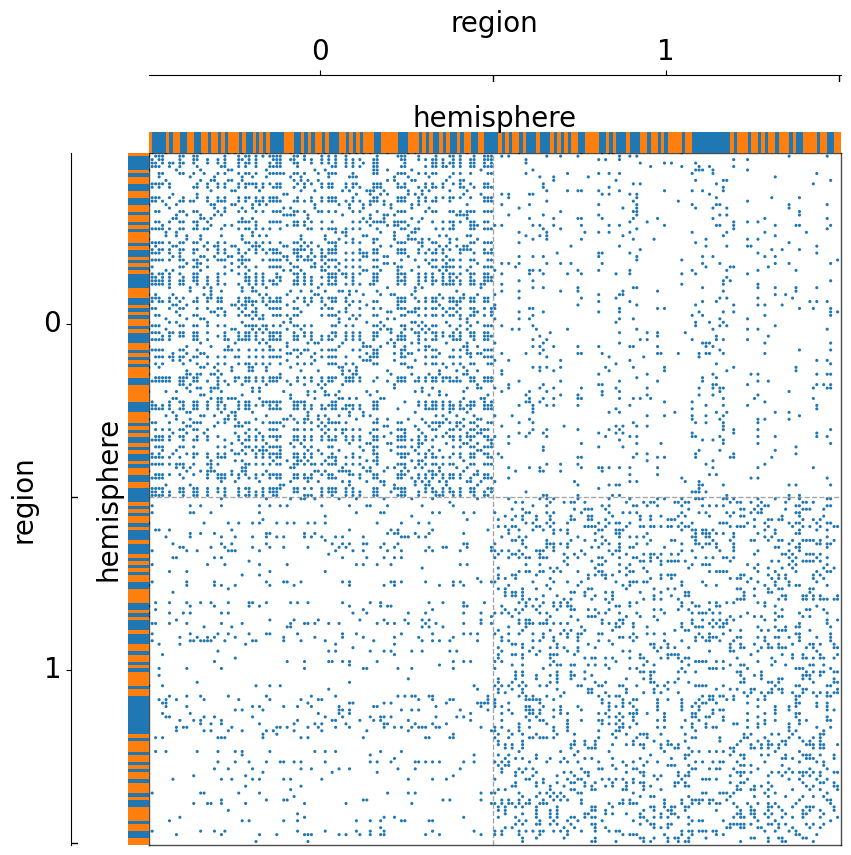
Group the matrix by another metadata (region), but with a color axis to label the hemisphre
[7]:
fig, ax = plt.subplots(1, 1, figsize=(10, 10))
adjplot(
    data=A,
    ax=ax,
    meta=meta,
    plot_type="scattermap",
    group=["region"],
    color=["hemisphere"],
    sizes=(5, 5),
)
[7]:
(<Axes: >,
 <mpl_toolkits.axes_grid1.axes_divider.AxesDivider at 0x7fe1c17e5120>)
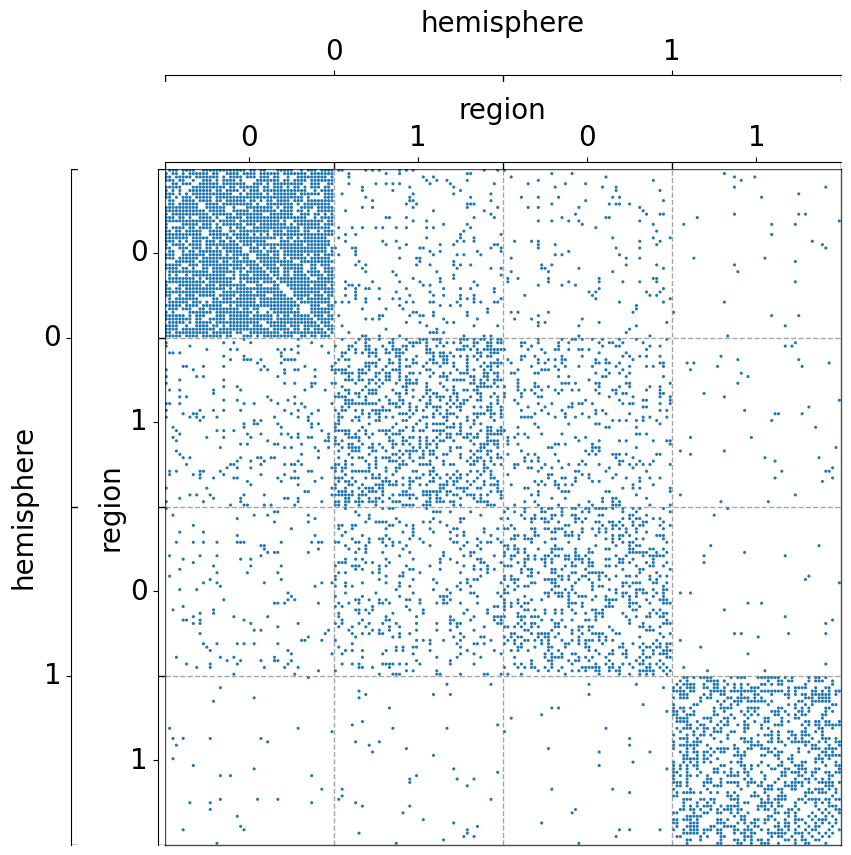
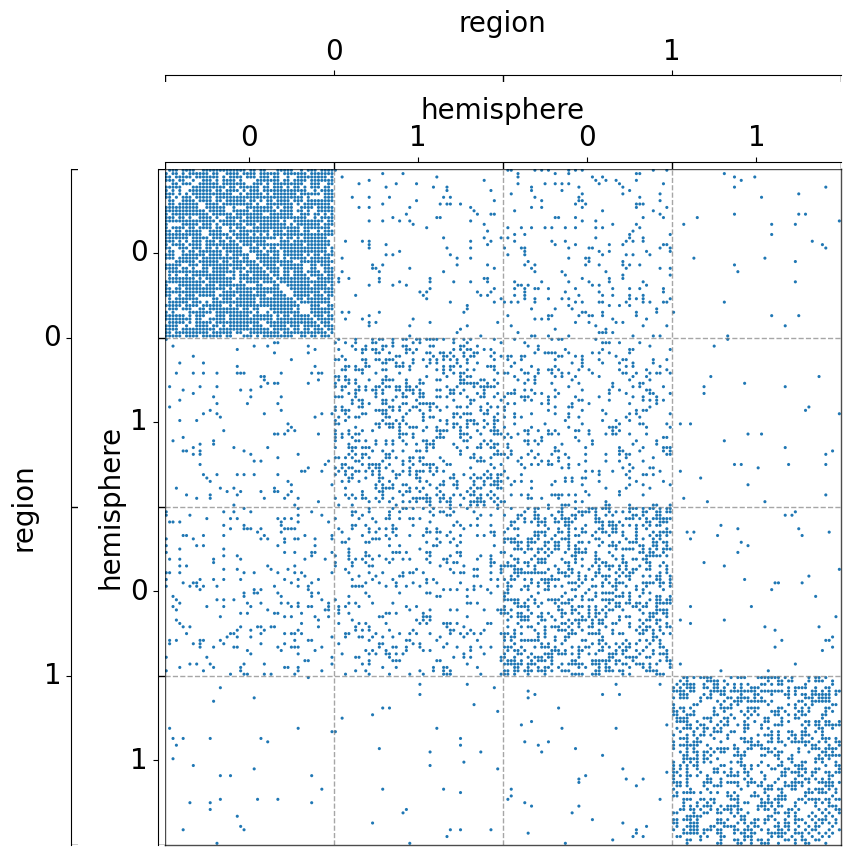
Group by two metadata at the same time
Notice that the order of the list matters.
[8]:
fig, ax = plt.subplots(1, 1, figsize=(10, 10))
adjplot(
    data=A,
    ax=ax,
    meta=meta,
    plot_type="scattermap",
    group=["hemisphere", "region"],
)

fig, ax = plt.subplots(1, 1, figsize=(10, 10))
adjplot(
    data=A,
    ax=ax,
    meta=meta,
    plot_type="scattermap",
    group=["region", "hemisphere"],
)
[8]:
(<Axes: >,
 <mpl_toolkits.axes_grid1.axes_divider.AxesDivider at 0x7fe1bc9b3ee0>)
The use of class_order
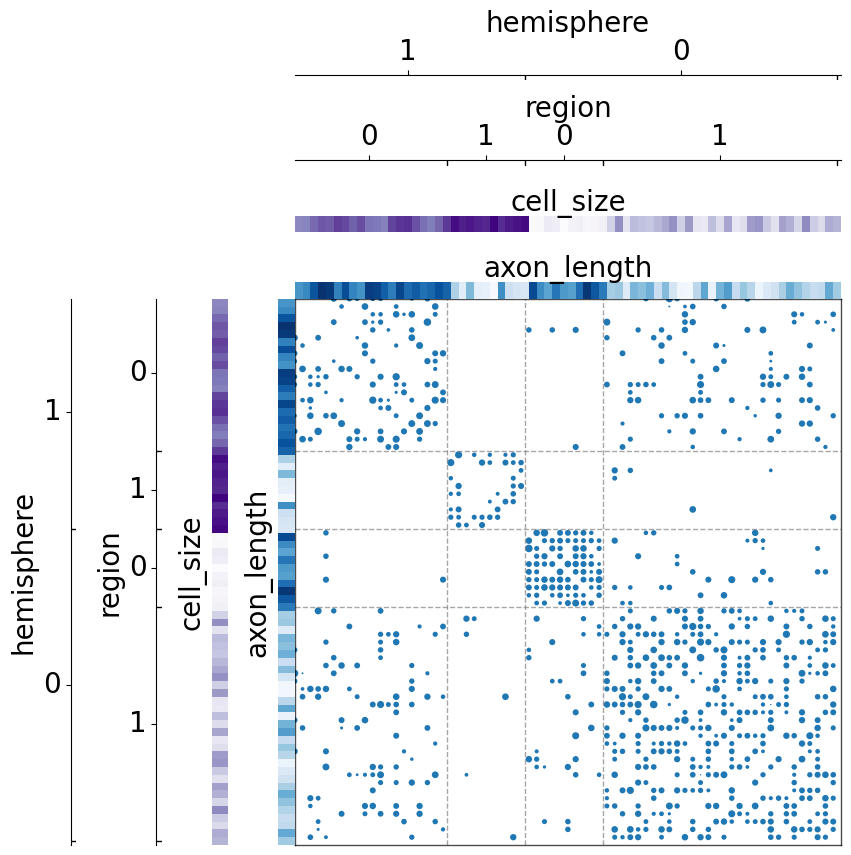
Sort the grouped classes by their sizes
If the grouped classes are of different sizes, we can sort them based on the size in ascending order.
[9]:
from numpy.random import normal
N = 10
n_communities = [N, 3*N, 2*N, N]
p = [[0.8, 0.1, 0.05, 0.01],
     [0.1, 0.4, 0.15, 0.02],
     [0.05, 0.15, 0.3, 0.01],
     [0.01, 0.02, 0.01, 0.4]]
wt = [[normal]*4]*4
wtargs = [[dict(loc=5, scale=1)]*4]*4

np.random.seed(2)
A = sbm(n_communities, p, wt=wt, wtargs=wtargs)
meta = pd.DataFrame(
    data={
        'hemisphere': np.concatenate((np.full((1, 4*N), 0), np.full((1, 3*N), 1)), axis=1).flatten(),
        'region': np.concatenate((np.full((1, N), 0), np.full((1, 3*N), 1), np.full((1, 2*N), 0), np.full((1, N), 1)), axis=1).flatten(),
        'cell_size': np.arange(7*N),
        'axon_length': np.concatenate((np.random.normal(5, 1, (1, N)), np.random.normal(2, 1, (1, 3*N)), np.random.normal(5, 1, (1, 2*N)), np.random.normal(2, 1, (1, N))), axis=1).flatten()},
)
rnd_idx = np.arange(7*N)
np.random.shuffle(rnd_idx)
A = A[np.ix_(rnd_idx, rnd_idx)]
meta = meta.reindex(rnd_idx)
[10]:
fig, ax = plt.subplots(1, 1, figsize=(10, 10))
adjplot(
    data=A,
    ax=ax,
    meta=meta,
    plot_type="scattermap",
    group=["hemisphere", "region"],
    group_order="size", # note that this is a special keyword which was not in `meta`
    color=["cell_size", "axon_length"],
    palette=["Purples", "Blues"],
    sizes=(1, 30),
)
[10]:
(<Axes: >,
 <mpl_toolkits.axes_grid1.axes_divider.AxesDivider at 0x7fe1c1ad6320>)
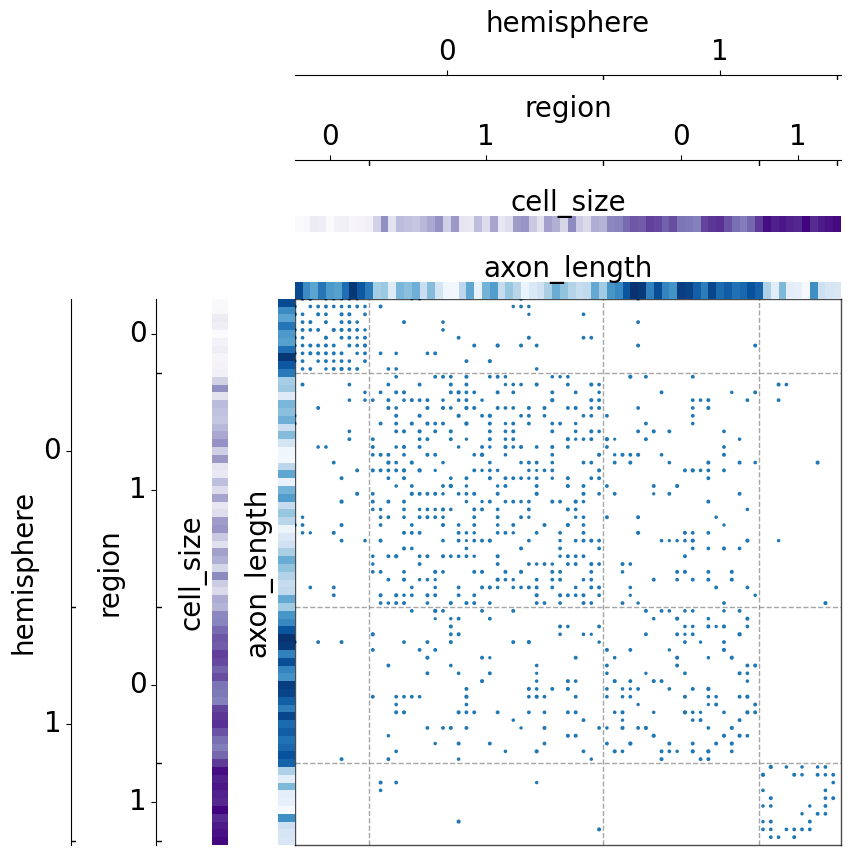
If the metadata has other fields, we can also sort by the mean of certain fields in ascending order
[11]:
fig, ax = plt.subplots(1, 1, figsize=(10, 10))
adjplot(
    data=A,
    ax=ax,
    meta=meta,
    plot_type="scattermap",
    group=["hemisphere", "region"],
    group_order=["cell_size"],
    color=["cell_size", "axon_length"],
    palette=["Purples", "Blues"],
)
[11]:
(<Axes: >,
 <mpl_toolkits.axes_grid1.axes_divider.AxesDivider at 0x7fe1bc7d3250>)
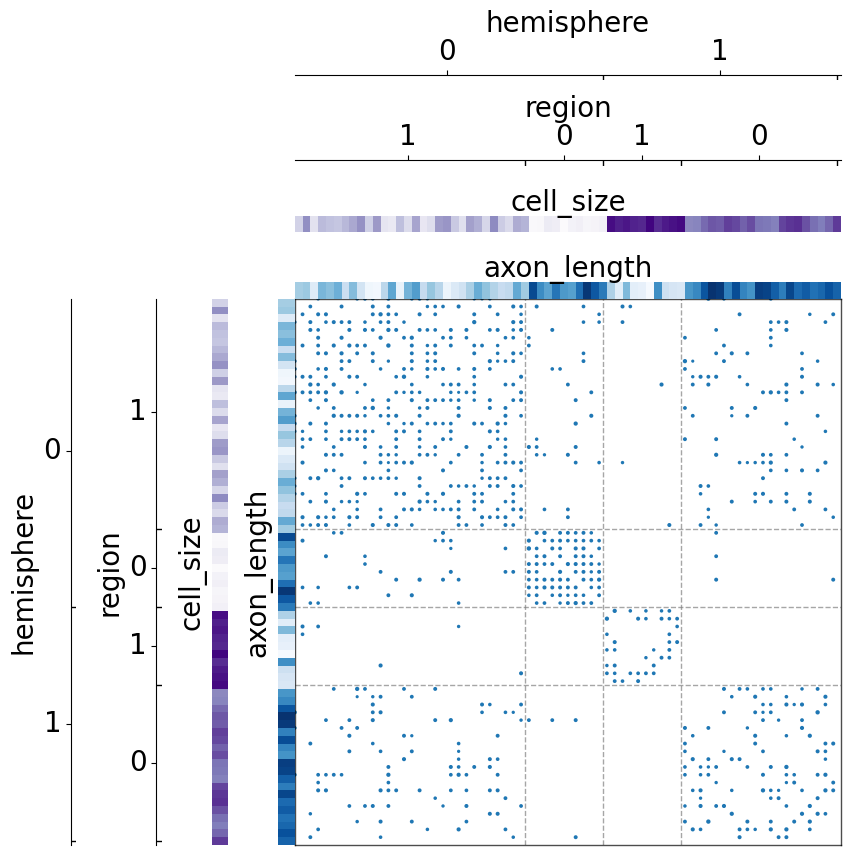
We can also sort by multiple fields at the same time, including the size of the group_class.
[12]:
fig, ax = plt.subplots(1, 1, figsize=(10, 10))
adjplot(
    data=A,
    ax=ax,
    meta=meta,
    plot_type="scattermap",
    group=["hemisphere", "region"],
    group_order=["cell_size", "axon_length"],
    color=["cell_size", "axon_length"],
    palette=["Purples", "Blues"],
)
[12]:
(<Axes: >,
 <mpl_toolkits.axes_grid1.axes_divider.AxesDivider at 0x7fe1c1bbdea0>)
The use of item_order
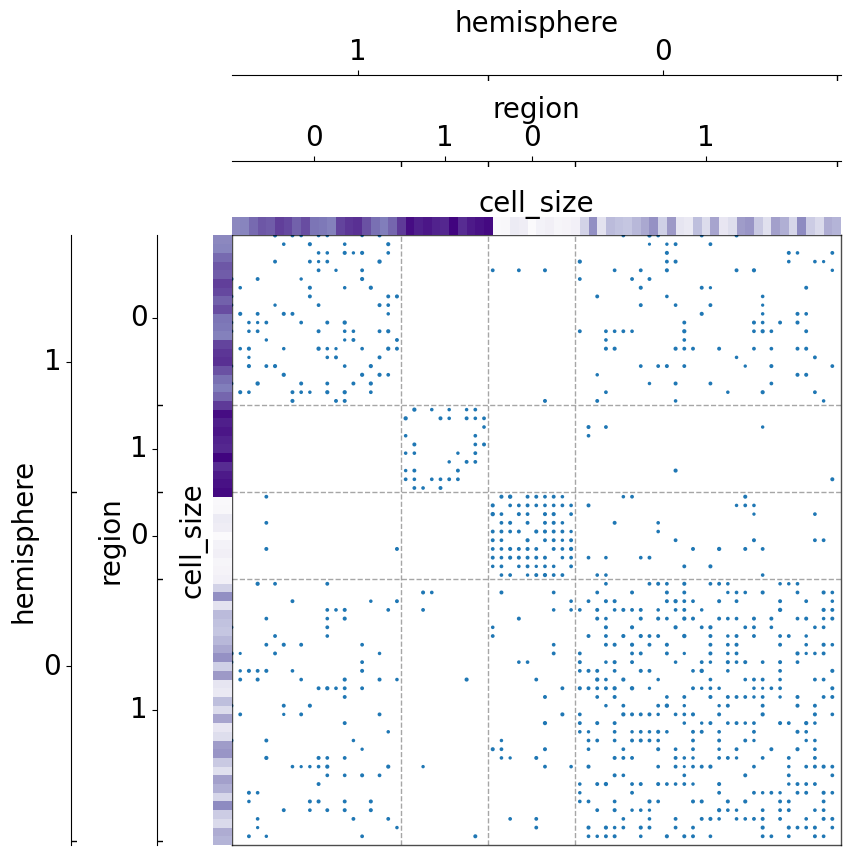
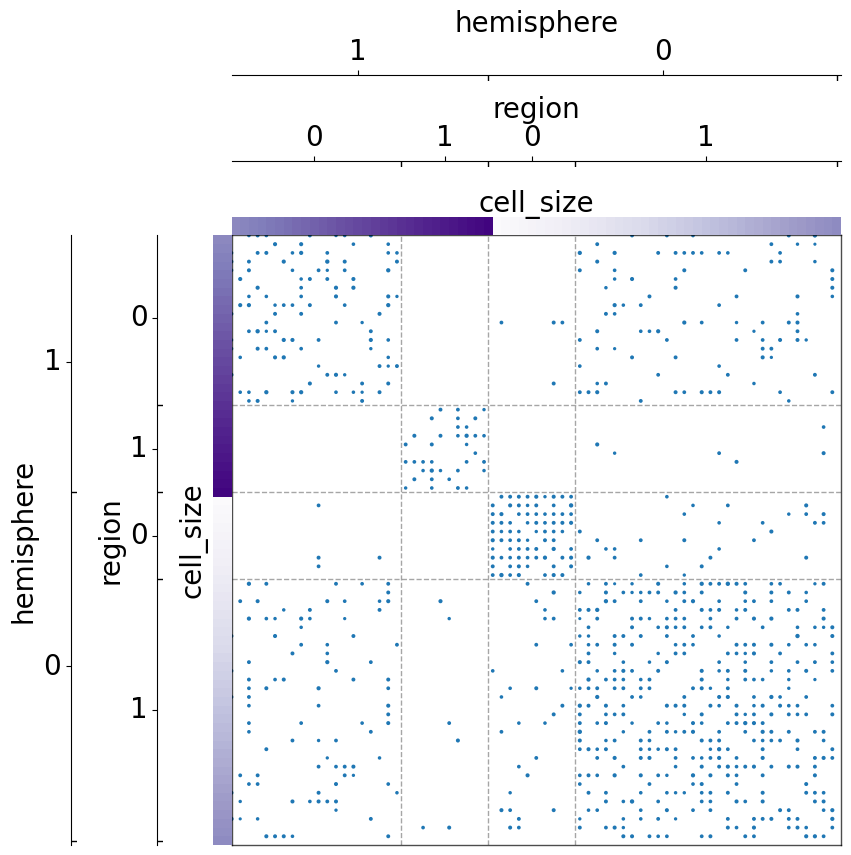
The parameter item_order is used to sort items within each specific class
Without sorting by item_order, the matrix remain randomized in each grouped class:
[13]:
fig, ax = plt.subplots(1, 1, figsize=(10, 10))
adjplot(
    data=A,
    ax=ax,
    meta=meta,
    plot_type="scattermap",
    group=["hemisphere", "region"],
    color=["cell_size"],
    palette="Purples",
)
[13]:
(<Axes: >,
 <mpl_toolkits.axes_grid1.axes_divider.AxesDivider at 0x7fe1c12e7640>)
But with sorting with item_order, the items are ordered within each grouped class:
[14]:
fig, ax = plt.subplots(1, 1, figsize=(10, 10))
adjplot(
    data=A,
    ax=ax,
    meta=meta,
    plot_type="scattermap",
    group=["hemisphere", "region"],
    item_order=["cell_size"],
    color=["cell_size"],
    palette="Purples",
)
[14]:
(<Axes: >,
 <mpl_toolkits.axes_grid1.axes_divider.AxesDivider at 0x7fe1bc2dc6a0>)
The use of highlight
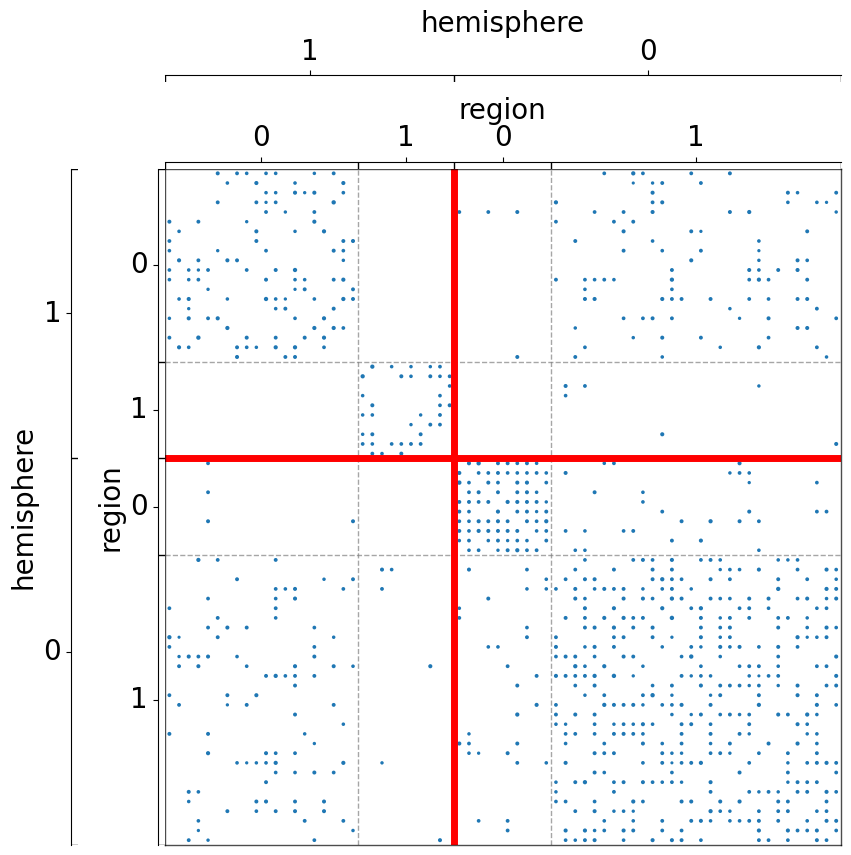
highlight can be used to highlight separators of a particular class with a different style
[15]:
fig, ax = plt.subplots(1, 1, figsize=(10, 10))
highlight_kws = dict(color="red", linestyle="-", linewidth=5)
adjplot(
    data=A,
    ax=ax,
    meta=meta,
    plot_type="scattermap",
    group=["hemisphere", "region"],
    highlight=["hemisphere"],
    highlight_kws=highlight_kws,
)
[15]:
(<Axes: >,
 <mpl_toolkits.axes_grid1.axes_divider.AxesDivider at 0x7fe1bc7d3160>)
The use of multiple palettes
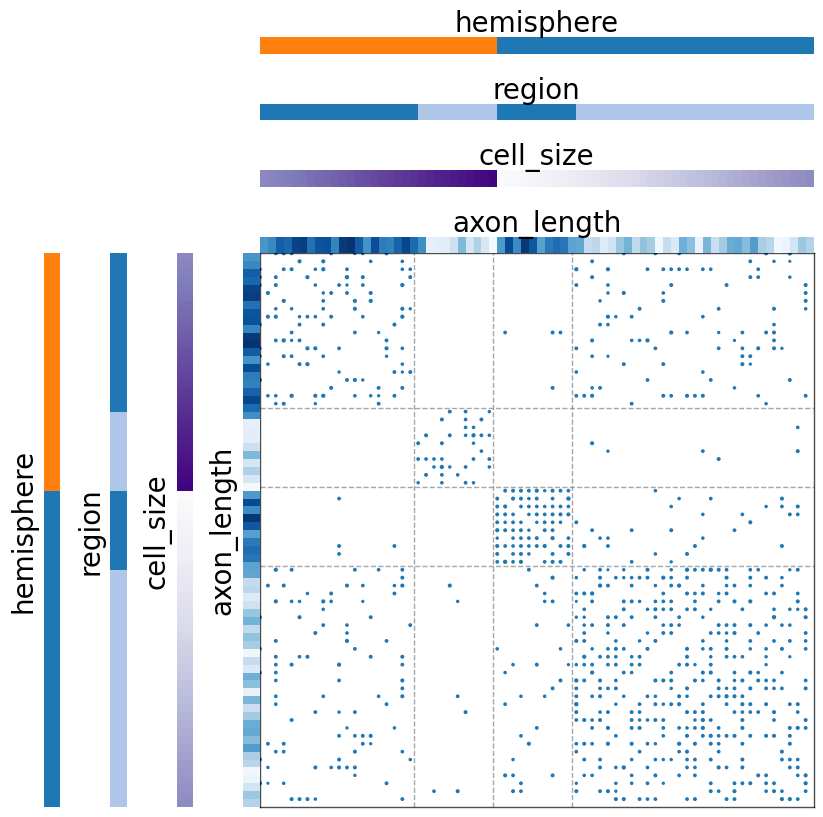
Each color can be plotted with the same palette, or different palettes can be specified for each color
[16]:
fig, ax = plt.subplots(1, 1, figsize=(10, 10))
adjplot(
    data=A,
    ax=ax,
    meta=meta,
    plot_type="scattermap",
    group=["hemisphere", "region"],
    ticks=False,
    item_order=["cell_size"],
    color=["hemisphere", "region", "cell_size", "axon_length"],
    palette=["tab10", "tab20", "Purples", "Blues"],
)
[16]:
(<Axes: >,
 <mpl_toolkits.axes_grid1.axes_divider.AxesDivider at 0x7fe1c1e30cd0>)
Label the row and column axes with different metadata
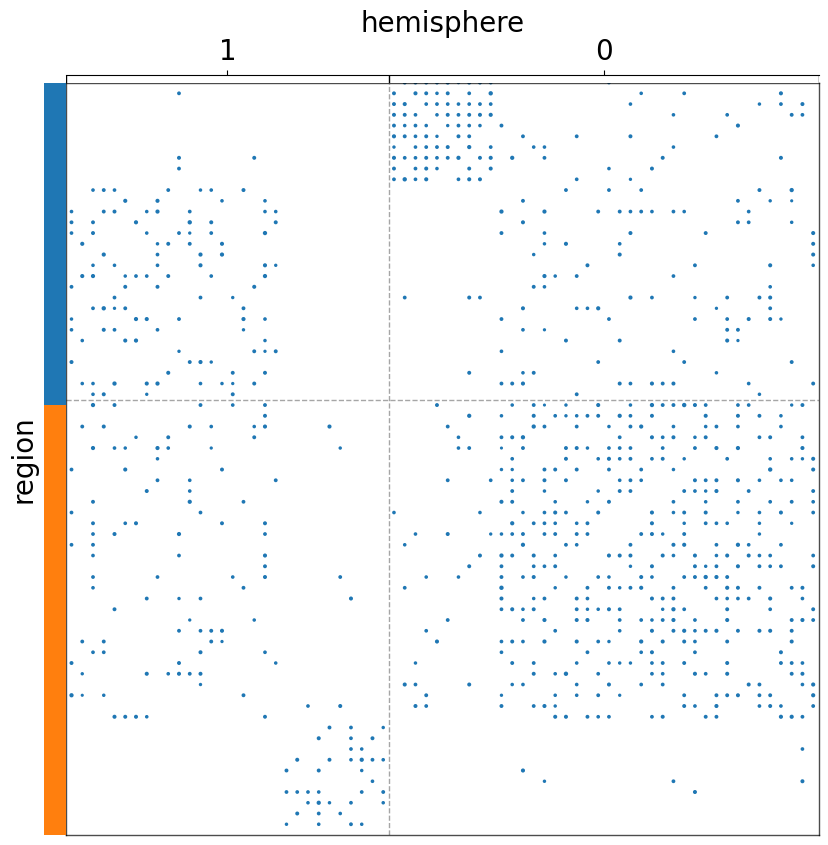
If you would like to group the row and columns by different metadata, you can use the matrixplot function to specify the parameters for both of the axes. Most arguments are the same, with the addition of row_ or col_ to specify the corresponding axis of data.
Note: for adjacency matrices, one should not sort the rows and columns separately, as it breaks the representation of the graph. Here we do so just for demonstration, assuming A is not an adjacency matrix.
[17]:
fig, ax = plt.subplots(1, 1, figsize=(10, 10))
matrixplot(
    data=A,
    ax=ax,
    col_meta=meta,
    row_meta=meta,
    plot_type="scattermap",
    col_group=["hemisphere"],
    row_group=["region"],
    col_item_order=["cell_size"],
    row_item_order=["cell_size"],
    row_color=["region"],
    row_ticks=False,
)
[17]:
(<Axes: >,
 <mpl_toolkits.axes_grid1.axes_divider.AxesDivider at 0x7fe1c1971d20>)
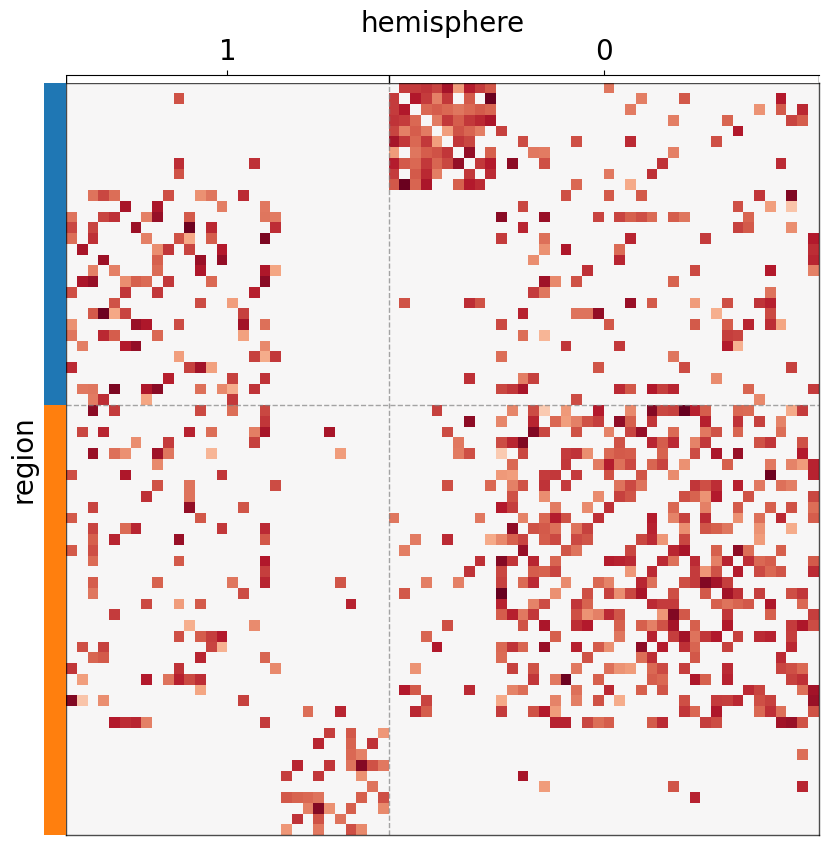
Plot using heatmap instead of scattermap
[18]:
fig, ax = plt.subplots(1, 1, figsize=(10, 10))
matrixplot(
    data=A,
    ax=ax,
    col_meta=meta,
    row_meta=meta,
    plot_type="heatmap",
    col_group=["hemisphere"],
    row_group=["region"],
    col_item_order=["cell_size"],
    row_item_order=["cell_size"],
    row_color=["region"],
    row_ticks=False,
)
[18]:
(<Axes: >,
 <mpl_toolkits.axes_grid1.axes_divider.AxesDivider at 0x7fe1b6a920e0>)
Supply array-likes instead of meta
If meta is not provided, each of the sorting/grouping/coloring keywords can be supplied with array-like data structures.
[19]:
group_0 = np.concatenate((np.full((4*N, 1), 0), np.full((3*N, 1), 1)), axis=0)
group_1 = np.concatenate((np.full((N, 1), 0), np.full((3*N, 1), 1), np.full((2*N, 1), 0), np.full((N, 1), 1)), axis=0)
group = np.concatenate((group_0, group_1), axis=1)

group = group[rnd_idx, :]
[20]:
fig, ax = plt.subplots(1, 1, figsize=(10, 10))
adjplot(
    data=A,
    ax=ax,
    plot_type="scattermap",
    group=group,
    sizes=(1, 30),
)
[20]:
(<Axes: >,
 <mpl_toolkits.axes_grid1.axes_divider.AxesDivider at 0x7fe1b6e7c880>)
